Seleksi ITNSA SMKN 2 Depok Sleman


📄 Download Soal Client Server V2 (PDF, 1.1 MB)
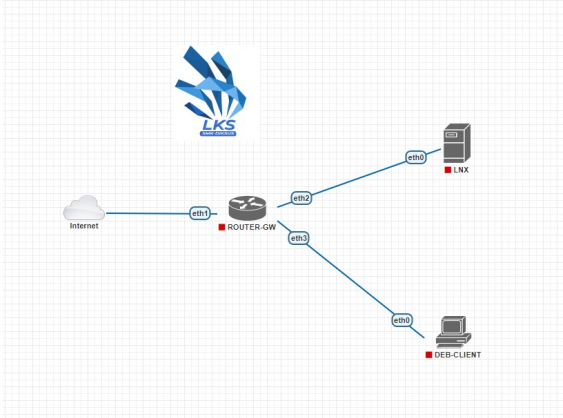
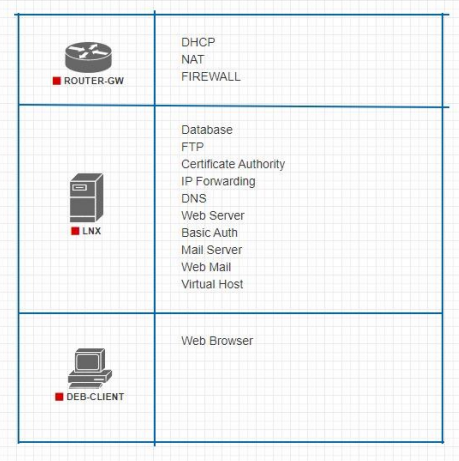
ROUTER-GW
Ganti password admin dengan Skills39
password
Ganti hostname router
/system identity set name=ROUTER-GW
Renew license
/system license generate-new-id


/system license renew
Aktifkan DHCP client pada ether1 (opsional)
/ip dhcp-client add interface=ether1 disabled=no
Tambahkan firewall NAT
/ip firewall nat add chain=srcnat action=masquerade out-interface=ether1
Tambahkan ip pada ether2
/ip address add interface=ether2 address=172.16.18.41/29
LNX
Konfigurasi IP statis
sudo nano /etc/network/interfaces
Ganti enp0s3 menggunakan IP statis
Ganti Hostname
sudo hostnamectl hostname LNX
edit file /etc/hosts
Edit file /etc/ssh/sshd_config
FTP (vsftpd)
Install vsftpd
sudo apt update
sudo apt install ftp vsftpd
Backup file konfigurasi
sudo cp /etc/vsftpd.conf /etc/vsftpd.conf.backup
Buat user competitor (jika belum ada)
sudo adduser competitor
Tambahkan user competitor ke userlist
sudo echo "competitor" | tee -a /etc/vsftpd.userlist
Buat directory FTP
sudo mkdir /home/competitor/share
sudo chown competitor:competitor /home/competitor/share
Konfigurasi FTP
sudo nano /etc/vsftpd.conf
Ubah beberapa baris berikut
Tambahkan di akhir
Restart service vsftpd
sudo systemctl restart vsftpd.service
DNS Server (Bind9)
Install bind9
sudo apt update
sudo apt install -y bind9
Konfigurasi bind9
sudo cd /etc/bind
sudo cp db.local db.stembayo.id
sudo cp db.127 db.172.16.1x
Edit file db.stembayo.id
Edit file db.172.16.11
Edit file named.conf.local
Edit file named.conf.options
Restart bind9
sudo systemctl restart bind9
Referensi: https://zonabiner.com/tutorial/debian/konfigurasi-dns
Certificate Authority & Wildcard SSL
Install easy-rsa
sudo apt update
sudo apt install easy-rsa
Persiapan
mkdir /ssl
mkdir newcerts crl
cd /ssl
touch index.txt
echo 00 > serial
Buat file openssl.cnf
Buat root ca.key
openssl genrsa -out ca.key 4096
Buat root ca.crt
openssl req -new -key ca.key -out ca.crt -config openssl.cnf -x509 -days 365
Buat sub CA key stembayo.id
openssl genrsa -out stembayo.id.key 4096
Buat sub CA CSR stembayo.id
openssl req -new -key stembayo.id.key -out stembayo.id.csr -config openssl.cnf -extfile openssl.cnf -extensions v3_req
TTD sub CA
openssl ca -config openssl.cnf -in stembayo.id.csr
Database (MariaDB)
Install mariadb
sudo apt update
sudo apt install -y mariadb
Secure setup mariadb
gunakan Skills39 sebagai password root
sudo mysql_secure_installation
Web Server (Nginx)
Instalasi
sudo apt update
sudo apt install -y nginx
Edit /etc/nginx/nginx.conf
Virtual Host (lnx.stembayo.id)
Buat directory
 sudo mkdir -p /var/www/lnx.stembayo.id/
 sudo chown -R $USER:$USER /var/www/lnx.stembayo.id/
 sudo chmod -R 755 /var/www/lnx.stembayo.id/
Buat file index.html
nano /var/www/lnx.stembayo.id/index.html
Buat virtual host
sudo nano /etc/nginx/sites-available/lnx.stembayo.id
Aktifkan virtual host
sudo ln -s /etc/nginx/sites-available/lnx.stembayo.id /etc/nginx/sites-enabled/
Cek konfigurasi
sudo nginx -t
Restart nginx
sudo systemctl restart nginx
Basic Auth
Install apache2-utils
sudo apt update
sudo apt install apache2-utils
Buat user baru
nama: competitor
pass: Skills39
sudo htpasswd -c /etc/nginx/.htpasswd user
Note: -c hanya digunakan saat pertama kali
Buat directory
 sudo mkdir -p /var/www/basic-auth.stembayo.id/
 sudo chown -R $USER:$USER /var/www/basic-auth.stembayo.id/
 sudo chmod -R 755 /var/www/basic-auth.stembayo.id/
Buat file index.html
nano /var/www/basic-auth.stembayo.id/index.html
Buat virtual host (basic-auth.stembayo.id)
sudo nano /etc/nginx/sites-available/basic-auth.stembayo.id
Aktifkan virtual host
sudo ln -s /etc/nginx/sites-available/basic-auth.stembayo.id /etc/nginx/sites-enabled/
Cek konfigurasi
sudo nginx -t
Restart nginx
sudo systemctll restart nginx
Referensi: https://www.digitalocean.com/community/tutorials/how-to-install-nginx-on-ubuntu-22-04
Wordpress
…
Mail Server (Dovecot)
…
Web Mail (Roundcube)
…